- Premiere Tutotial
How to Make Camera Shake in Premiere and FilmoraPro Easily
Jun 28,2019• Proven solutions
The After-Effects built-in camera stabilizer is a powerful tool and with the addition of the Warp Stabilizer feature, it has even got better. Many editors want to pursue stabilization effects while editing. These features make it a favourite for many who cannot afford the stabilization or tracking tools.
But, are you looking for the effects that are completely opposite in Premiere? Unlike After-Effects, Premiere is not loaded with such features. Do you have a stable footage and wish to introduce camera shake in Premiere?
The camera shake feature can create interesting videos that may take you completely by surprise. In this article, let’s learn how to make camera shake in Premiere and FilmoraPro.
How to make camera shake easily
If you want to make camera shake effect easily, try FilmoraPro. It is designed for people who want to improve video editing skills from basic level. For camera shake effect, you just need to drag and drop. Check the steps below.
- Import video to FilmoraPro and drag it onto timeline.
- Search "shake" in the effects panel. You will find Shake effect in the grunge tab. Drag it onto video clip.
- Now, you will see the camera shake is added. If you want to make it better, go to controls tab to adjust it's amount, speed, fractal and more. Download it to have a try!

Part 1:How to Make Camera Shake in Premiere
Step 1: Firstly, you need to use the footages to create a sequence on which you wish to add the camera shake in Premiere. Once done, add an online shaken clip or any part of the footage of your own that is not stabilized and a bit camera shaken clip. Add this shaken clip above the tripod shot.
Step 2: Both the shaken and the sequence footages must be cut into the same length, highlighted, and nest it by right-clicking and going to the “nest”. When your sequence is ready, go to the Effects tab. It will reach you to the warp stabilizer VFX. Drag it over the nested sequence. Now, from Effects Control, go to Warp Stabilizer to select the scale, position and rotation method. Open both pieces of footage sequence by double-clicking on the nested footage.

Step 3: Check the left part of the timeline to look for eyeballs. The eyeball that connects with the camera shake footage must be clicked to make the footage invisible and leave it with just the tripod shot. Next, going back to the nested shot, you can find the warp stabilizer applied to your tripod shot. This is how you can create the Premiere pro shake effect.
Part 2:Best Earthquake Preset for Premiere
Do you wish to create the Premiere pro shake effect? From giving a shake effect to your music videos to creating the earthquake effect, the Premiere pro preset pack offers 6 unique types of varied effects that you can mix with your style and preferences. The 6 effects are – gentle, zoom, rotation, pulsation, lighting, and heavy shakes. It is a completely free tool for Premiere pro shake effect that you can easily download, use, and also publish.
How to Install It
To create the camera shake in Premiere, the Premiere pro preset pack is a great free tool that you can install in just a few easy steps.
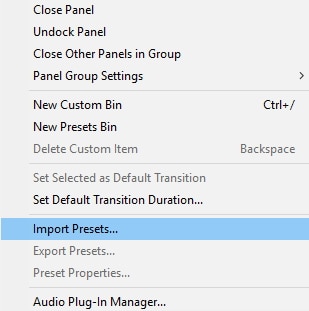
Once downloaded, import the Preset files into Premiere Pro. To import, you need to right-click on the Presets folder and click on the Import Presets option. You get all the 6 preset options to give camera shake in Premiere. So, just drag any of the 6 presets that you wish to add on any of the clips. You may also combine two presets with the separate front letters to create a new effect for camera shake in Premiere.

Conclusion
With the above steps, you can easily create Premiere pro shake effect. It might sound difficult but when you follow the above steps and use the tools as mentioned; giving camera shake in Premier is not only easy but also clean and effective.
Bring up your video to a professional level with straightforward tools.
Try It Free Try It Free


Liza Brown
chief Editor
0 Comment(s)